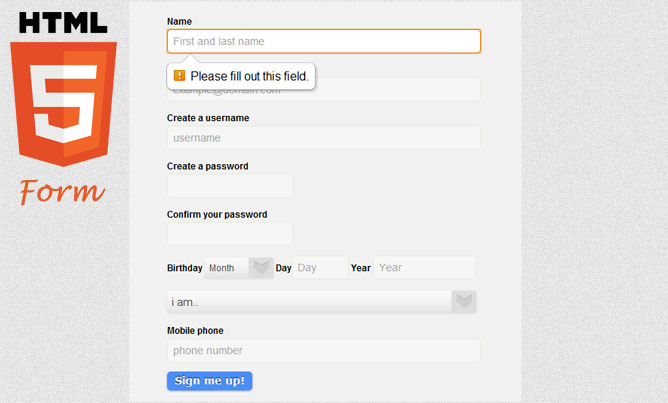
Today I will show you a beautiful registration form using HTML5 and CSS3 properties, this sample design you may using in purpose visitor registration online. HTML5 have new feature elements properties, it can defines new input types that you can use in your forms validation in stead of using java script. But those HTML5 and CSS3 properties support only new modern browser, i recommend (google chrome) is great browser support with HTML5 and CSS3.
In my previous tutorials, i also show you HTML5 and CSS3 Contact Form, and with this sample registration form template, you will know more about HTML5 form property.
Please note that this will only work properly in modern browsers that support the HTML5 and CSS3 properties in use.
The Markup
The HTML registration form will have the following structure:
      <div  class="form">
    		<form id="contactform">
    			<p class="contact"><label for="name">Name</label></p>
    			<input id="name" name="name" placeholder="First and last name" required="" tabindex="1" type="text">

    			<p class="contact"><label for="email">Email</label></p>
    			<input id="email" name="email" placeholder="[email protected]" required="" type="email">

                <p class="contact"><label for="username">Create a username</label></p>
    			<input id="username" name="username" placeholder="username" required="" tabindex="2" type="text">

                <p class="contact"><label for="password">Create a password</label></p>
    			<input type="password" id="password" name="password" required="" type="text">
                <p class="contact"><label for="repassword">Confirm your password</label></p>
    			<input type="password" id="password" name="password" required="" type="text">

               <fieldset>
                 <label>Birthday</label>
                  <label class="month">
                  <select class="select-style" name="BirthMonth">
                  <option value="">Month</option>
                  <option  value="01">January</option>
                  <option value="02">February</option>
                  <option value="03" >March</option>
                  <option value="04">April</option>
                  <option value="05">May</option>
                  <option value="06">June</option>
                  <option value="07">July</option>
                  <option value="08">August</option>
                  <option value="09">September</option>
                  <option value="10">October</option>
                  <option value="11">November</option>
                  <option value="12" >December</option>
                  </label>
                 </select>
                <label>Day<input class="birthday" maxlength="2" name="BirthDay"  placeholder="Day" required=""></label>
                <label>Year <input class="birthyear" maxlength="4" name="BirthYear" placeholder="Year" required=""></label>
              </fieldset>

            <select class="select-style gender" name="gender">
            <option value="select">i am..</option>
            <option value="m">Male</option>
            <option value="f">Female</option>
            <option value="others">Other</option>
            </select><br><br>

            <p class="contact"><label for="phone">Mobile phone</label></p>
            <input id="phone" name="phone" placeholder="phone number" required="" type="text"> <br>
            <input class="buttom" name="submit" id="submit" tabindex="5" value="Sign me up!" type="submit">
   </form>
</div>
The Cascading Style Sheets (CSS) will have the following structure:
.form{
	background:#f1f1f1; width:470px; margin:0 auto; padding-left:50px; padding-top:20px;
}
.form fieldset{border:0px; padding:0px; margin:0px;}
.form p.contact { font-size: 12px; margin:0px 0px 10px 0;line-height: 14px; font-family:Arial, Helvetica;}

.form input[type="text"] { width: 400px; }
.form input[type="email"] { width: 400px; }
.forminput[type="password"] { width: 400px; }
.form input.birthday{width:60px;}
.form input.birthyear{width:120px;}
.form label { color: #000; font-weight:bold;font-size: 12px;font-family:Arial, Helvetica; }
.form label.month {width: 135px;}
.form input, textarea { background-color: rgba(255, 255, 255, 0.4); border: 1px solid rgba(122, 192, 0, 0.15); padding: 7px; font-family: Keffeesatz, Arial; color: #4b4b4b; font-size: 14px; -webkit-border-radius: 5px; margin-bottom: 15px; margin-top: -10px; }
.form input:focus, textarea:focus { border: 1px solid #ff5400; background-color: rgba(255, 255, 255, 1); }
.form .select-style {
  -webkit-appearance: button;
  -webkit-border-radius: 2px;
  -webkit-box-shadow: 0px 1px 3px rgba(0, 0, 0, 0.1);
  -webkit-padding-end: 20px;
  -webkit-padding-start: 2px;
  -webkit-user-select: none;
  background-image: url(images/select-arrow.png),
    -webkit-linear-gradient(#FAFAFA, #F4F4F4 40%, #E5E5E5);
  background-position: center right;
  background-repeat: no-repeat;
  border: 0px solid #FFF;
  color: #555;
  font-size: inherit;
  margin: 0;
  overflow: hidden;
  padding-top: 5px;
  padding-bottom: 5px;
  text-overflow: ellipsis;
  white-space: nowrap;}
.form .gender {
  width:410px;
  }
.form input.buttom{ background: #4b8df9; display: inline-block; padding: 5px 10px 6px; color: #fbf7f7; text-decoration: none; font-weight: bold; line-height: 1; -moz-border-radius: 5px; -webkit-border-radius: 5px; border-radius: 5px; -moz-box-shadow: 0 1px 3px #999; -webkit-box-shadow: 0 1px 3px #999; box-shadow: 0 1px 3px #999; text-shadow: 0 -1px 1px #222; border: none; position: relative; cursor: pointer; font-size: 14px; font-family:Verdana, Geneva, sans-serif;}
.form input.buttom:hover	{ background-color: #2a78f6; }
Now! It have a beautiful registration form with HTML5 and CSS3. Check out the demo below, and feel free to download this example for future use. I hope you enjoyed this tutorial and find it useful!


it’s really nice thank
Thanks Graham 🙂
Thanks for this nice form design tutorial
very beautiful template.thank
this is lovely! thanks!
was looking for this actually to see how you styled the tag arrow,
but in Firefox on Mac it is still rendered with the default arrow, so i guess i ‘ll need a workaround…